Saturday, March 19, 2016

Indigo Bag– A Monkey Wrench Surrounded By Geese. Project Quilting Challenge 6, Season 7

This week’s challenge was to make something that would include the block Monkey Wrench and a Flying Geese Block. I was unsure of what a Monkey Wrench block was. As I looked it up on google, I realized it was one of my favorite blocks which also goes under the name Churn Dash. I first made this block several years ago as I took one of first quilting classes and we were doing a sampler quilt. I’m not sure why, but something about this block, the traditional look, the shape, the simplicity, who knows, but it just appeals to me.  This block goes by many names and was thought to have originated between 1800- 1840. other names include Broken Plate, Double Monkey Wrench, Double T,  Hole in the Barn Door, Indian Hammer, Joan's Doll Quilt,  Love Knot, Old Mill Design,  Picture Frame, Puss in the Corner, Quail's Nest, Sherman's March and Wrench.
    I decided to do a tote as my challenge. I started off making a simple bag, but the project grew and grew in size and in detail.Rolling on the floor laughing    I ended up with a 17 inch by 17 inch tote, with bindings on the outside seams and a fabric padded , shaped handle with lots of detailed quilting. I'm not sure what goes on with me and these challenges. The ideas start flowing and can't stop. As I drive to and from work, as I'm doing anything that allows me free time to think, I just keep thinking of new ideas that I can add to my weekly challenge. I usually stay up late the night before my challenge is due, one night until 5AM)  trying to complete my challenge due to my constant flowing of ideas!

bag1 My fabrics, Low Country Indigo by Windham Fabrics.
The fabric in the pictures looks black, but it is actually a deep dark Indigo blue.  After living in Japan for 2 years, I fell in love with Indigo dyed fabrics as they were everywhere  and oh so beautiful!

bag2  My Monkey wrench block(Churn Dash)
bag3Adding geese to edges
bag4Front block of bag done                                  bag5 Sandwiched and machine quilted using various designs
bag6Quilted back of bag, sandwiched and completed


bag7Pieces for front, back, 2 sides and bottom quilted and ready to assemble


As I began to put my tote together  I decided it needed something. (Ha, more ideas!) I thought adding a little red fabric would give it a POP   Open-mouthed smile


bag8Bag beginning to be sewn together. I decided to sew it from outside, ( Sewn with wrong sides together) and to put outside bindings on seams for a clean finish. No exposed frayed seams at all in this bag.When that goes together it is gives the bag a stiffer more completed appearance on the outside. And the bag can stand up!!


bag9Done!!!!! Front of tote Remember it is dark, dark blue, not black

bag10Back of bag
bag11Side of the bag.


baginside    Inside of bag.
3 pockets on both sides to hold lots of goodies!


Hope you enjoyed my pics! Thanks again Kim at Project Quilting for all your hard work putting this challenge together!! Till next time! Irene xo

Sunday, March 13, 2016

Ode to My Quilting Mother

    I guess you can say my quilting adventures began on April 25, 2011. That is the day my Mom died. 
    My Mother was an avid quilter. She sewed ever since I can remember, making matching dresses for my 2 sisters and me, Halloween costumes galore and curtains to fill the windows of all the homes we occupied, as we moved every few years since my Dad was in the military. Her quilting passion began after my siblings and I had left home. She joined her church sewing guild, a separate local quilting guild, and went to every class on quilting available to her in the area. As her love for quilting progressed, she assembled a abundant supply of quilting tools and the exciting sewing machines that went with it. I remember when my dad gave her favorite most treasured possession, a Bernina 1630 Inspiration Update 96. With this machine, she continued to quilt for fundraisers at the church, for new babies, and a special quilt for each grandchild as they graduated from High School. Each and every project so was so special, thought out as to color and design to match the personality of the recipient.
   After my Mom died, my Dad pulled me aside one day. “Your Mom’s sewing machine meant so much to her, would you be interested in it?”  I was taken aback. How could I ever use her prized possession? I would fail, my sewing ability could not honor this machine of my mother’s. These and other crazy thoughts flew through my head. I had sewn a little since I was married:  a few simple costumes and lots of curtains (we also moved in the military). The whole idea of quilting scared me. All those small pieces, all the colors, and all the complicated designs seemed so daunting to me as a basic sewer. 

   My Dad took me to my Mom’s quilt room to help me pack up her machine. Beside it was a pile of fabric readied to begin a quilt for my niece in honor of her high school graduation the following June, but with only one trial block done. Later that week I kept thinking of that fabric just lying there. I went back later, I took that material. I searched for the closest quilt shop and entered a new world.  I scheduled a time for the owner to sit with me and teach me some basics. In a day, Kathy taught me rotary cutting and how blocks go together. I picked a simple pattern, a split rail fence, that she assured me I could complete. We would put my Mom’s trial block in the center. I spent many days at that shop. I completed that quilt. My niece was brought to tears as she received this gift from my Mom and me.
   Now I am hooked. Almost 5 years later I have completed over 12 full sized quilts and other smaller projects. Just like Mom, I take every class that is available . I visit any quilt shop I see, and attend every quilt show nearby. I even have gotten my neighbor to start quilting. We now get together most Friday nights to sew. Recently my friend Pam expressed an interest in quilting. I showed her a few things and less than 4 months later she has whipped out 2 bed sized quilts that were absolutely amazing!!! It is so much fun to have friends to quilt with!
    I can’t help but think of my Mom as I get her trusty Bernina sewing. Thank you for such a great gift Mom!
 
first quiltfirst quilt2
My first quilt. I even got to long arm it on an old free motion machine at the local quilt shop!

disappearing hourglass- MSQC
A recent quilt of mine.  Design MSQC- Disappearing hourglass.

my 50th bday quilt from my Mom
This is one of my Mom’s quilts as a gift to me on my 50th birthday. A triple Irish Chain. Can’t ever imagine working with those postage stamp sized pieces!

Sunday, March 6, 2016

Through The Eyes of A Child-Project Quilting Season 7


This will be a quick blog as I am less than 30 minutes from the deadline for Project Quilting!!! ( I was able to add my process below today 3-7-2016)

I loved this week's challenge, "Through the Eyes of a Child"…. But my ideas wouldn’t stop and my details ended up taking me a VERY long time! But ta-da….I”m done!!!
When I think of a child’s world, I can only imagine what they are visualizing is what they portray as they color and draw. These are those great pictures they are so proud of when they bring them home from school. I remember rainbows, bright colors, always a sun and animals such as birds, our dog, our cat and butterflies. I would place these treasured pictures on my refrigerator for all to see! In my portrayal of a child's drawing, I added as much as I could with my time constraint with LOTS of COLOR!  Get your sunglasses!!!And here it is.
eyes
It is 47 inches x38 and a nice baby blanket size! Hope it won't keep the baby up with all those colors! Ha

Some close ups
eyes2 My wonky smoking house
eyes3 The MUST rainbow and dog chasing a cat up a tree
eyes4 And here is MR Sun, a butterfly and of course a colorful flower

My Process:


So like many quilters, I have alot of stash. I was determined to try to use my stash for this project, and was fairly successful. I confess I did have to buy a fat quarter of the green zizzag as I didn't have enough...
Lots of colorful pieces, many left from my Thread Challenge!


I began with my house, was attempting a whimsy feel, so added a wonky house. To tell the truth, I wasn't so happy with my house and almost scrapped it several times, but ended up adding the bird a scalloped front and smoke which helped sorta get closer to that feel. If I could do it again, I'd stick with a plain house and make it whimsy with colors and cute details.

I choose a simple snowball block for the trees. I designed some applique animals, bird, cat, scottie dog after searching the internet for ideas,


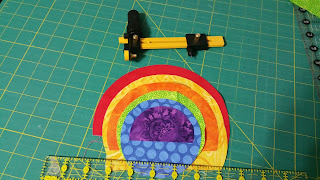
I had to add a rainbow, seriously this was not as easy as I thought! I tried several ways, but ended up using a round rotary cutter, doing increasing sized circles and pasting together and appliqueing.

The sun was made through variation of a Dresdan block.

I added all these details and included some others, a butterfly and colorful appliqued flower. I wanted to add a few other details, additional flowers, another bird in my second tree. But I ran out of time!
After doing my center "drawing", I added borders and completed my sandwich with batting and a nice flannel back. Then quilted and quilted..... 


eyes5 And here is my trusty Bernina which allows me to do some machine quilting… I got her for a birthday gift in December. I'm still learning!

Thanks to Kim Lapacek at Project Quilting for her challenges!! I'm learning so much by trying new techniques.
 Till next time! Irene xoxo

Saturday, February 20, 2016

I need a vacation! Project quilting challenge #7


So this week’s quilting challenge is, “I need a vacation”.

  The title reminds me of the old commercials, “Calgon Take me Away!!!”  In the series of commercials with the same general theme,  women are shown having frustrating, terrible days and in exasperation call out , “Calgon Take me Away!” In response the women are immediately taken to a warm bathtub filled with loads of bubbles and appear to be relaxed and carefree.  https://www.youtube.com/watch?v=WVf1lClfBng   Here's the link if you want to see the old commercial! I digress....

    The title of this challenge reminds me of those commercials. I picture a place which is warm, where there is no sense of time, a place that is carefree. To capture this place in a quilt, now that is a challenge!

   I wanted to try to recreate the feeling I had on a recent vacation to Hawaii with a good girlfriend of mine. The beach, sunset, all the amazing colors in the sunset, that’s my vacation! Now I had to make it different a slight twist, so I made my quilt to resemble a postcard,    “Wish you were here!”. I invite you to visit my vacation in this quilted postcard!


vacation1
These are my fabrics! I found this really beautiful tie dyed fabric that reminded me of a beautiful sunset.
vacation2
I began building the background by cutting a simple landscape shapes
vacation3
I cut templates from cardboard to make the outline of palm trees on a beach. After cutting the tree shape and repositioning them till I liked how they looked, I decided to add a moon in the corner. I appliqued all the trees down and applique the landscape lines.
 vacation4vacation5
I added a border and corner pieces to attempt to create the appearance of a postcard. I layered the front, batting and a back panel. I quilted the entire piece. I used a version of echo quilting for the moon and the water, and free motion stippling for the remainder of the quilt.
vacation7vacation8
The back of my “postcard” with my Flip-flop postage stamp.

vacation6
Wish You Were Here! Embroidered by machine.


I hope you enjoyed my vacation postcard. Till next time!
Irene


calgon commercial

Sunday, February 7, 2016

Project Quilting Challenge #7, Threads!

 
Off to DC for a superbowl get together so this has to be quick! Ill try to add more details later.

Edited and add ons! 2/8/16

Back home after a fantastic weekend with my daughter and son -in-law. Went down to DC to go "Mother of the groom"  dress shopping. Being from a very small town, with 1stoplight, we have limited shopping.
   Good news! With the help of my daughter and the great sales associate, Kristen, at Rent the Runway, I found my dress! Yay!! after dress shopping we settled down with our guys and ate some wonderful food and watched the game. It was a very nice time.

This weeks challenge was title “Threads”. As I look at my thread collection I see color, color, color.  I love color. So I was up for the challenge. I ended up with a finished runner 51x23 inches. 

I have just moved into my new quilt room after taking over my daughters old bedroom, (She is now a young adult and working woman) thanks Lara! I'm excited to hang this in my new quilt room!

This is my very basic scribbled design when I was planning. I wanted fun, lots of color. My thread collection is very colorful , so I thought that I wanted to portray that.


20160203_223440


So here is my colorful fabric, mostly fat quarters except the yellow stripe.
20160203_184553Fabrics:


So I found this new technique for cutting half square triangle. Its a free pattern on craftsy.com  You can adjust for the size triangle you wish. These are 3inch squares.
You are able to get 8 squares from 2 pieces of fabric magically cut.

here's the link: http://www.craftsy.com/blog/2014/01/how-to-make-half-square-triangles/

20160203_200729


So I used 3 fabrics in the color group cut in thin strips and stacked those to get the look of a true thread spool. Put these all together for my spool block.

20160204_004901

Now to get the look of thread coming off the spool..... I attempted using very colorful matching thread, but it looked so small next to my spool. I wanted that "fun, bold feel".
So I decided to applique strips on using a modified "Landscape quilting technique". Funny because "Quilting with Nancy" was on public television and she was talking about her landscape quilting. Got some great tips from her!


I free handed curly strips, a very slow process, but I was happy with how they turned out. Then I designed the "needle". That sounds easy, but I couldn't get the look I wanted. Finally googled "cartoon needle and thread images" which gave me some good ideas.
20160206_132837Cutting a blue strip, see all the various curly strips above.


Put all my blocks together than applique the curly threads on with monofilament thread.

I added warm and natural batting, and a backing made of left over fat quarter strips.


20160207_113721-1
Backing

  I stippled the yellow and curly threads portions of each block. I stitched in the ditch over the spools.


20160207_113902
Stippling

20160207_113650-1
Finished Runner!
Thanks to my hubby for holding it for pic!


Thanks for looking at my project and thanks to Kim at Persimmons Dreams for our Project Quilting Challenges!

Till next time!! <3    Irene

Saturday, January 23, 2016

Challenge quilt ***Seasons!


So I’m all about making gifts now for people. At this point in my life I have everything I need, and so do most of my friends and family. So the Quilt Challenge this week was Seasons…. I bought this really cute pillow pattern from Kookaburra Cottage, a very small company, at the Lancaster quilt show last year. I thought immediately of my sister who loves fun, bright, whimsical things.
So long story short. It has snowed here in central PA since Friday! We are not used to this kind of snow!! Perfect quilting weather. I decided to make this pillow for my sister. It  definitely represents spring, and after this crazy snowfall of 31 inches, I'm deeply yearning for spring!
20160118_213036
Hard to get a great picture since it is 20x20 inches and quite fluffy! It has this cute ruching around the pillow. Which was kindof a pain to do…quirky putting it on.
I started with yo yos, lots of them in various sizes. I used a clover yo yo tool finally, and did make this process easier.
19204 (1)
Then I cut a 22x22 front piece, and back piece and a lining for my front to give it stiffness…
20160118_131558

The back I made 3 buttonholes to insert pillow form. It ended up a little off center, but that definitely represents me! and I attached a label ..
20160118_213124

Enjoy the pics and let me know if you have questions!
This is the view yesterday during the blizzard out to my garden house
20160123_121211
The sun is out today , YAY! and here is this am early!
20160124_091039
And thank God I bought my husband a snowblower 2 years ago!
20160124_094422