Wednesday, October 18, 2017
Renie on the Farm: Barn Quilt!
Renie on the Farm: Barn Quilt!: I have been fascinated by Barn Quilts since I saw 2 hung at the Pennsylvania Farm show 2 years ago. I've seen pictures popping up onl...
Sunday, August 13, 2017
Barn Quilt!
I have been fascinated by Barn Quilts since I saw 2 hung at the Pennsylvania Farm show 2 years ago. I've seen pictures popping up online and got the idea. I have a barn, why not build a barn quilt?. Maybe I can start a trend in my small town.
After doing some research, I found that a small barn quilt trail had been started at my adjacent county Perry County, the quilts were designed by HS students. With further research I found a great web site that even went into detailed instructions on how to prepare and build a barn quilt.
https://www.extension.iastate.edu/Documents/MCMS/flPlymouthCountyISUBarnQuiltDirections.pdf


There it was. Easy right??!!
The hard part was picking a design and then the colors. Jinny Beyers had a great selection of traditional quilt blocks on her web site which I found very helpful
https://www.jinnybeyer.com/quilting-with-jinny/design-board/browse.cfm?page=5&sort=newest&limit=48
My barn was built in the late 1800's and it sits behind my traditional 1800 Limestone Farmhouse. I needed a traditional block with traditional colors to fit into my setting. There were way too many choices, but I narrowed it down to these blocks. The final decision went to The Grandma's Star.

I went to paint store and got paint samples. I cut the actual samples up in tiny pieces, ha the outline was a 2x2 inch block. I taped my VERY rough pieces on the outline to test my colors.

With the barn quilt being outside I wanted to make sure it would survive harsh weather. I would hate to go through so much work and the pain fade, or peel.
I got an oil based primer, I bought Zinser brand, and put on 3 coats to the bare wood. I also primed the base/frame pieces.

I bought outdoor latex paint for colors. I used Behr brand from Home Depot, I've used Behr Brand paint before and have been happy with the results.


I'm lucky as I have a big barn to set up in. I can leave the pieces to dry and get back to them and they are out of the way.

Plus I have my handy blue tooth speaker to provide me entertainment as I work through this project! Thanks to my lovely daughter and her husband for the nice gift that I continue to use!
As I continue I will add pictures and updates on how my barn quilt progresses.
Update 8/13/2017:
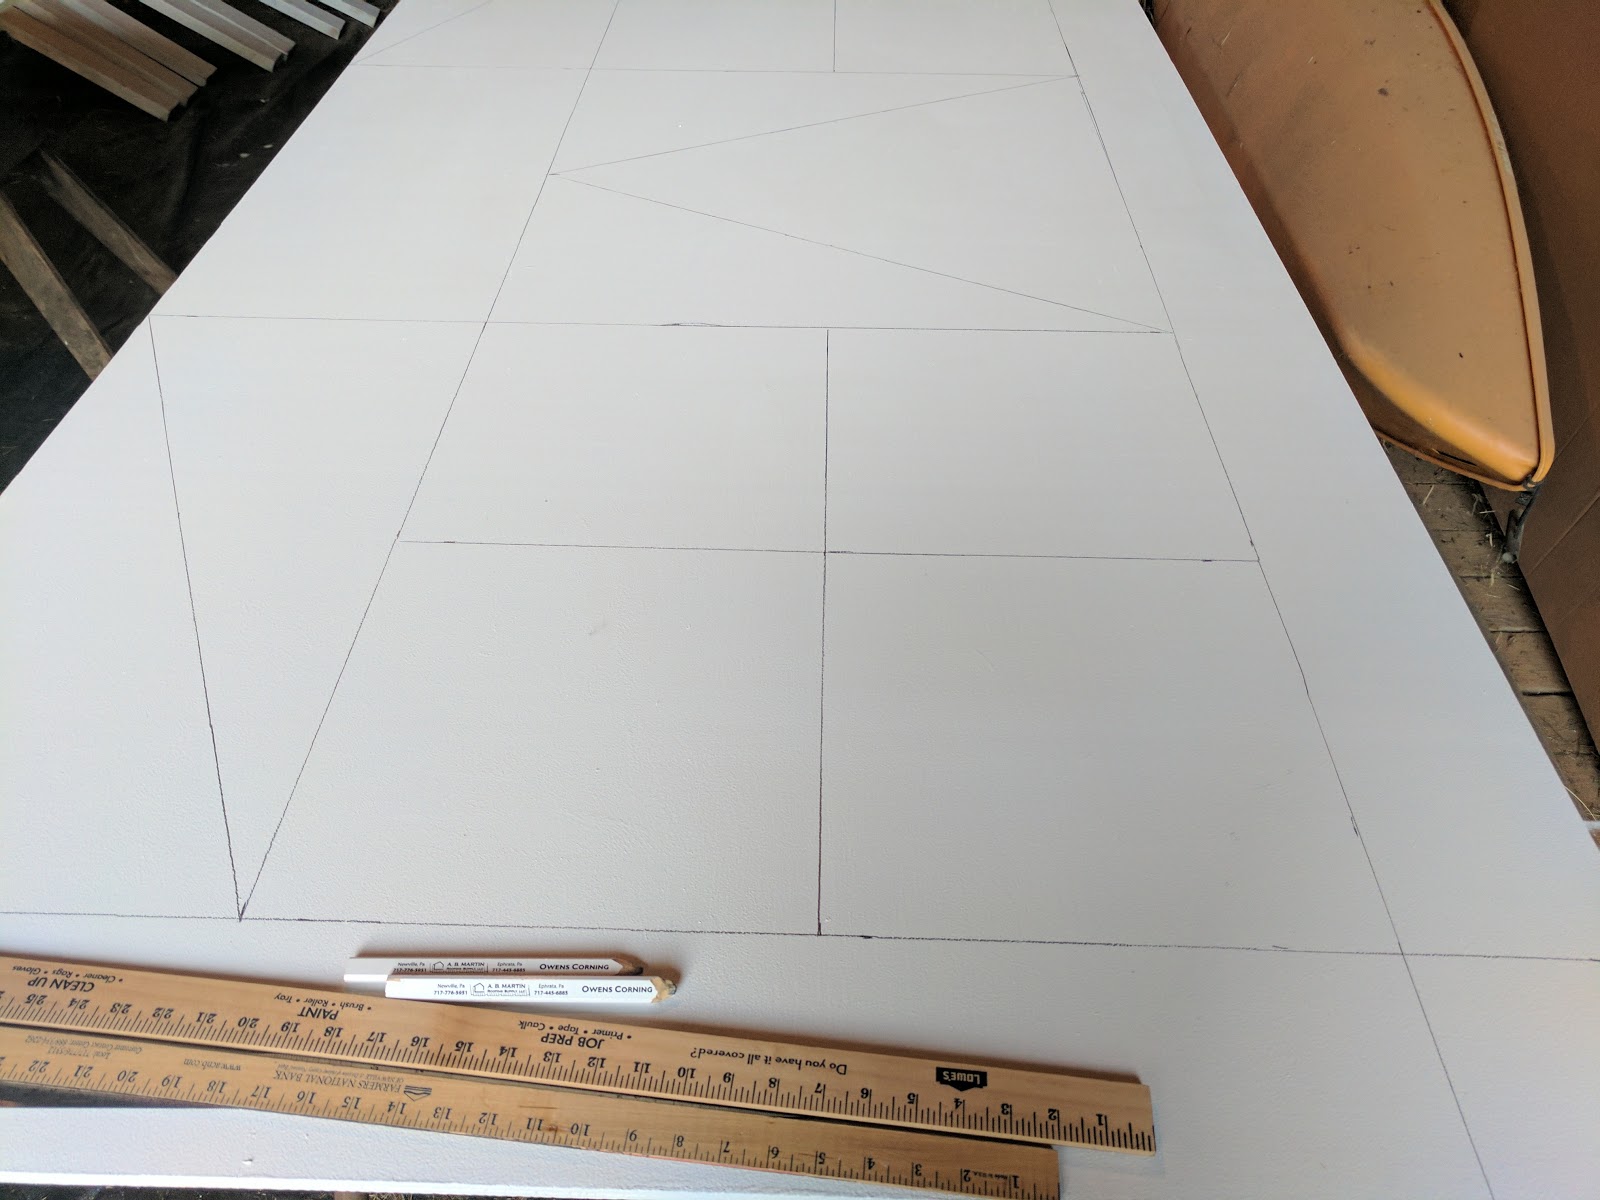
Yesterday I measured and marked out my quilt blocks on the primed boards. I used pencil and yardsticks. Below a picture, but it is difficult to see.
So I began to paint last night! I started by taping around the blocks I was painting. I'm starting with my lighter colors and then will move to the dark colors. Since Im using tape to get sharp points, It is necessary to wait before putting tape on top of the previously painted areas. Per the instructions on the tape. It must have been dried over 24 hours : ( Can I be that patient?
I will put 2 coats of each paint so in the morning the second coat goes on.
More updates later!
8/18/17
So my Barn Quilt project is going well. I began my last color yesterday. I have little patience and the waiting hours between coats of paint has been extremely difficult for me!
I placed 2 coats of each paint color, before moving onto next color. I waited approximately 10 hours between each coat. The paint has seemed to be pretty set and dry at this point and I have not had any problems with paint coming off when I removed the tape.


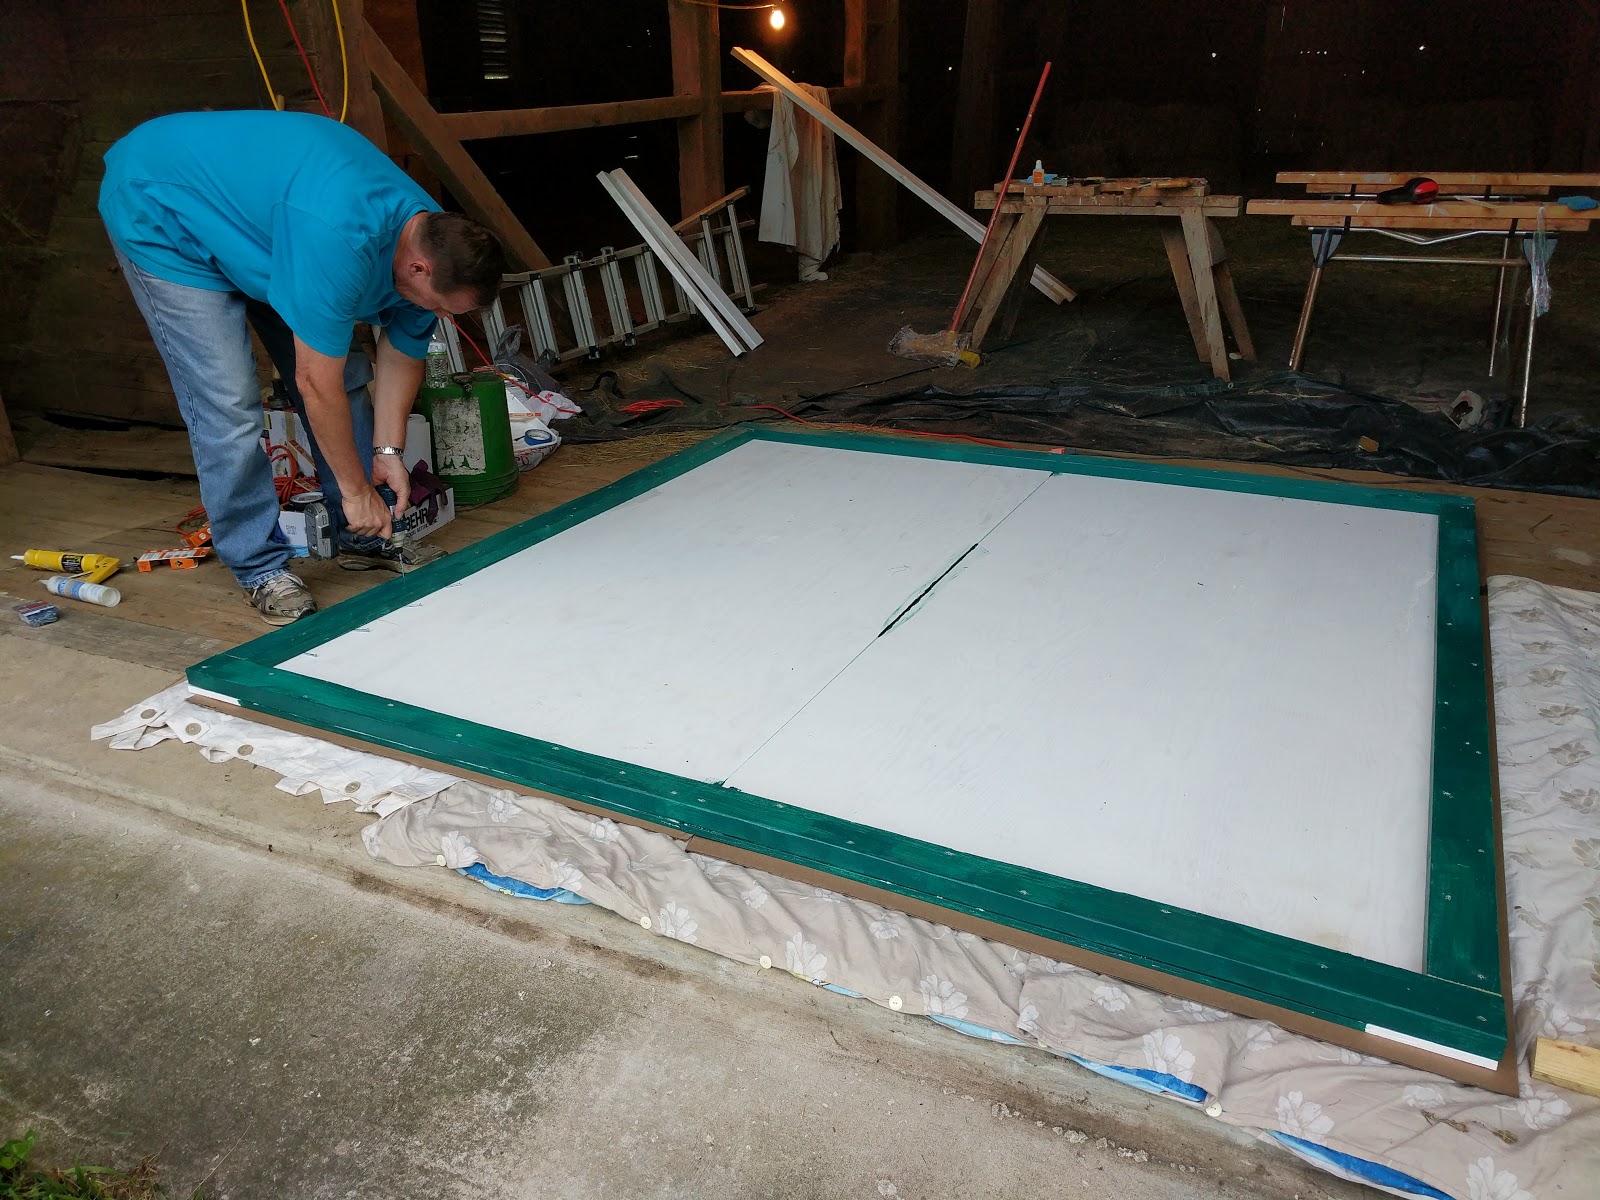
Today I'm removing the last of the tape, adding a coat of paint to the frame pieces (2x4's).And then start constructing the frame for the back of the quilt, (With the help of my handy husband and his power tools!)
8/29/17
She's up!! The barn quilt that is. Ill catch up now on the rest of my process
With my husbands help we framed the plywood boards to give it stability and to hold the 2 4x8 pieces together. we fiirst placed gorilla glue and then drove screws through the 2x4 just into the plywood, avoiding puncturing the front of the quilt itself. My husband used 1 3/4 wood screws. #8X.


 We also placed a center frame to keep the center from warping and to pull the sides close
We added a strip of tin T top for water protection.We bent it around the entire top and stapled down.

She's done, and now we have to move her. She was extremely heavy at this point.

 Then getting her up. We own a bucket truck and my husband created a harness to help hoist her up.


On the bottom we placed L brackets. After determining placement, We drilled the L Brackets f into the barn and they assisted in keeping the quilt level while the top brackets were drilled in. Almost like a shelf, and then these were screwed to bottom base 2x4.
We placed flat long metal brackets on back of the top 2x4 and screwed those through front of the barn where there was a beam behind the boards.(Almost like drilling into the stud)
And now she is up all I have to do is a little touch up to cover the brackets and some nicks from hanging...
What do you think?
 |
Wouldn't a Barn Quilt look nice centered on my barn? |
After doing some research, I found that a small barn quilt trail had been started at my adjacent county Perry County, the quilts were designed by HS students. With further research I found a great web site that even went into detailed instructions on how to prepare and build a barn quilt.
https://www.extension.iastate.edu/Documents/MCMS/flPlymouthCountyISUBarnQuiltDirections.pdf


There it was. Easy right??!!
The hard part was picking a design and then the colors. Jinny Beyers had a great selection of traditional quilt blocks on her web site which I found very helpful
https://www.jinnybeyer.com/quilting-with-jinny/design-board/browse.cfm?page=5&sort=newest&limit=48
My barn was built in the late 1800's and it sits behind my traditional 1800 Limestone Farmhouse. I needed a traditional block with traditional colors to fit into my setting. There were way too many choices, but I narrowed it down to these blocks. The final decision went to The Grandma's Star.


I got an oil based primer, I bought Zinser brand, and put on 3 coats to the bare wood. I also primed the base/frame pieces.


Plus I have my handy blue tooth speaker to provide me entertainment as I work through this project! Thanks to my lovely daughter and her husband for the nice gift that I continue to use!
 |
| My Bluetooth Speaker Entertainment |
 |
3 coats of Primer on boards |
 |
| base boards primed |
Update 8/13/2017:
Yesterday I measured and marked out my quilt blocks on the primed boards. I used pencil and yardsticks. Below a picture, but it is difficult to see.
 |
Sketch with measurements |
 |
| You can see the corner 4 patch |
So I began to paint last night! I started by taping around the blocks I was painting. I'm starting with my lighter colors and then will move to the dark colors. Since Im using tape to get sharp points, It is necessary to wait before putting tape on top of the previously painted areas. Per the instructions on the tape. It must have been dried over 24 hours : ( Can I be that patient?
 |
White and light Teal is painted |
More updates later!
8/18/17
So my Barn Quilt project is going well. I began my last color yesterday. I have little patience and the waiting hours between coats of paint has been extremely difficult for me!
I placed 2 coats of each paint color, before moving onto next color. I waited approximately 10 hours between each coat. The paint has seemed to be pretty set and dry at this point and I have not had any problems with paint coming off when I removed the tape.


Today I'm removing the last of the tape, adding a coat of paint to the frame pieces (2x4's).And then start constructing the frame for the back of the quilt, (With the help of my handy husband and his power tools!)
8/29/17
She's up!! The barn quilt that is. Ill catch up now on the rest of my process
With my husbands help we framed the plywood boards to give it stability and to hold the 2 4x8 pieces together. we fiirst placed gorilla glue and then drove screws through the 2x4 just into the plywood, avoiding puncturing the front of the quilt itself. My husband used 1 3/4 wood screws. #8X.


She's done, and now we have to move her. She was extremely heavy at this point.


On the bottom we placed L brackets. After determining placement, We drilled the L Brackets f into the barn and they assisted in keeping the quilt level while the top brackets were drilled in. Almost like a shelf, and then these were screwed to bottom base 2x4.
We placed flat long metal brackets on back of the top 2x4 and screwed those through front of the barn where there was a beam behind the boards.(Almost like drilling into the stud)
And now she is up all I have to do is a little touch up to cover the brackets and some nicks from hanging...
What do you think?


 |
| Add caption Hope this blog was of help to you in getting your barn quilt going. Message me if you need any additional information! Renie |
Sunday, March 19, 2017
My Dad's Clocks-PQ Season Eight
This week's Project Quilting challenge was "Time's Up". It is our final challenge of season eight
There is nothing like finishing a quilt in a week. This challenge had me up until 3:30 AM finishing so I can post my blog this morning. This has been a regular routine, I would work late into the night before each challenge was due. For me, it was a constant flowing of ideas and project creep. My idea would continue to blossom all week, I would add an extra portion here or there up until the last moment. Some of this was my inexperience, not knowing the most efficient way to get my ideas to work on fabric.I have made many mistakes, ripped out so many seams, started over and even changed my plan mid week!
So I decided to do a quilt of clocks. My Dad collected clocks. They were in each room, some rooms had several and each clock had its unique sound as it chimed or tolled. He tried to have the clocks go off at the same time, and it was always quite loud on the hour. When he died, there were 14 running clocks. Now I'm not talking small clocks. My favorite was a 10 foot tall grandfather clock that he discovered at an antique shop in pieces when I was a small child. Then there was a dutch clock with brass pear shaped weights and a very old hand painted cuckoo clock that he had purchased for my Mom when they were first married in 1956. I have a few of his clocks and have added a few of my own. As they chime they always remind me of him!
.


And of course I must label my quilt! This is something I am really trying to do with each of my projects. My embroidery machine has really helped me making these quick labels
My finished project It is 43x38 inches


There is nothing like finishing a quilt in a week. This challenge had me up until 3:30 AM finishing so I can post my blog this morning. This has been a regular routine, I would work late into the night before each challenge was due. For me, it was a constant flowing of ideas and project creep. My idea would continue to blossom all week, I would add an extra portion here or there up until the last moment. Some of this was my inexperience, not knowing the most efficient way to get my ideas to work on fabric.I have made many mistakes, ripped out so many seams, started over and even changed my plan mid week!
So I decided to do a quilt of clocks. My Dad collected clocks. They were in each room, some rooms had several and each clock had its unique sound as it chimed or tolled. He tried to have the clocks go off at the same time, and it was always quite loud on the hour. When he died, there were 14 running clocks. Now I'm not talking small clocks. My favorite was a 10 foot tall grandfather clock that he discovered at an antique shop in pieces when I was a small child. Then there was a dutch clock with brass pear shaped weights and a very old hand painted cuckoo clock that he had purchased for my Mom when they were first married in 1956. I have a few of his clocks and have added a few of my own. As they chime they always remind me of him!
.


So I decided to do a quilt with clocks . I went through my fabric and found some vintage clock fabric which was a perfect choice for this challenge.

I decided I wanted to try some reverse applique an new technique for me. Basically I cut circles in the fabric, made an finished seam on the inside and added a quilt block behind it.I used an easy technique by Dale Fleming. Here's a link to a video on the technique Dale Fleming 6 min circles


I am fascinated by Gypsy quilts, love the randomness, the different block sizes put all in one quilt. So I decided to attempt a version of that. It looked easy, but was more challenging than I thought and I had to do quite a bit of piecing and cutting. I decided on a few bigger blocks which would be the faces of the clocks and smaller blocks to represent the pendulum portions.
 |
| My Initial layout |
 |
| I had so many scraps left after making these blocks all fit together!! |
 |
| Pieced And Ready To Quilt! |
And of course I must label my quilt! This is something I am really trying to do with each of my projects. My embroidery machine has really helped me making these quick labels
 |
| Label |
My finished project It is 43x38 inches
My Dad's Clocks


Thanks again to Kim +PersimonDreams and Trish for putting these fantastic challenges together! I have learned so much and am amazed when I look back to last year to see my progression.
Till next time!
Sunday, March 5, 2017
Well Dressed Man! PQ Challenge Season 8
I was excited to work on this week's challenge. I had a great idea for the challenge, plus I got to do a project that has been on my bucket list for many years! Figured this would be the test run for a larger quilt in the future.
There is nothing like a man in uniform and in my life there have been many. My father was in the Army for 30 years, my husband is a retired Army Officer on active duty for 30 years, and now my son is serving. When I met my husband many years ago he was attending United States Military Academy at West Point. I remember going up to NY to visit him when we first met. Oh my, the cadets all looked so handsome.
Then my son decided to attend USMA too. I'll never forget the first time I saw him in his uniform, it actually brings tears to my eyes thinking about it!! I was a proud Mama.


So getting back to the challenge! My son had brought home his uniform pants that he wore everyday for class. I had asked him to as my thoughts were to make a quilt out of them. Well they have sat and sat now for over 3 years. So I had the incentive to use them when this challenge was announced. I knew I couldn't make a large quilt, but figured this would give me some experience working with the old wool pants.
I began by cutting up the pants. Each pair has a black stripe running down the outside of both legs. I cute up 3 pairs.


From the 3 pair I was able to make 64- 4 patch units which I put together. This was the hardest as the seams were very thick and required a lot of steaming. And Yuck, steamed wool seems bad! ( I mentioned this fact to my son, and he said I should have experienced the smell of wet cadets after walking through the rain in a closed classroom.)

I wanted to keep the quilt traditional and "antique looking" as USMA has been around a very long time.
I decided to add a saw tooth border and ha I got a sunflower.
So after ripping those out, I added a black border and used my embroidery machine to add corner blocks. I was lucky to find the West Point symbol on etsy for download, and it was only $2.95!!Score.


I added these borders than recycled my Saw tooth borders adding a few squares.


There is nothing like a man in uniform and in my life there have been many. My father was in the Army for 30 years, my husband is a retired Army Officer on active duty for 30 years, and now my son is serving. When I met my husband many years ago he was attending United States Military Academy at West Point. I remember going up to NY to visit him when we first met. Oh my, the cadets all looked so handsome.
 |
| Graduation 1983 |


I began by cutting up the pants. Each pair has a black stripe running down the outside of both legs. I cute up 3 pairs.


I wanted to keep the quilt traditional and "antique looking" as USMA has been around a very long time.
I decided to add a saw tooth border and ha I got a sunflower.
 |
| My sunflower, ha not the look I was going for!!! |
So after ripping those out, I added a black border and used my embroidery machine to add corner blocks. I was lucky to find the West Point symbol on etsy for download, and it was only $2.95!!Score.


I made a label which I have been really trying to be better about labeling my quilts. My new embroidery machine has helped that.

Im done!


My Cadet finished size 35x35 inches
Thanks again to Kim and Trish for making this all possible!
Till next time! Renie
Subscribe to:
Comments (Atom)